Interaction Builder: Build Multi-Step Tap Flows
Build multi-step tap flows with the visual Interaction Builder. Covers every step type (Message, Form Input, vCard, WiFi Share, Display Information Table, Webhook, Zapier, Send Email, Google Review, URL Redirect), the Design tab, and saving step-based interactions.
What the builder is for
The Interaction Builder is how Account Managers and Tag Managers build step-based interactions — reusable tap responses that can do more than one thing in sequence. Each saved interaction is assigned to a Kitetag Group, and every tag in that group runs the same flow.
The builder is also used to create the simpler single-action quick-create templates (URL Redirect, Webhook, vCard, Zapier) from the Interactions page — those are one-step versions of the same flow engine.
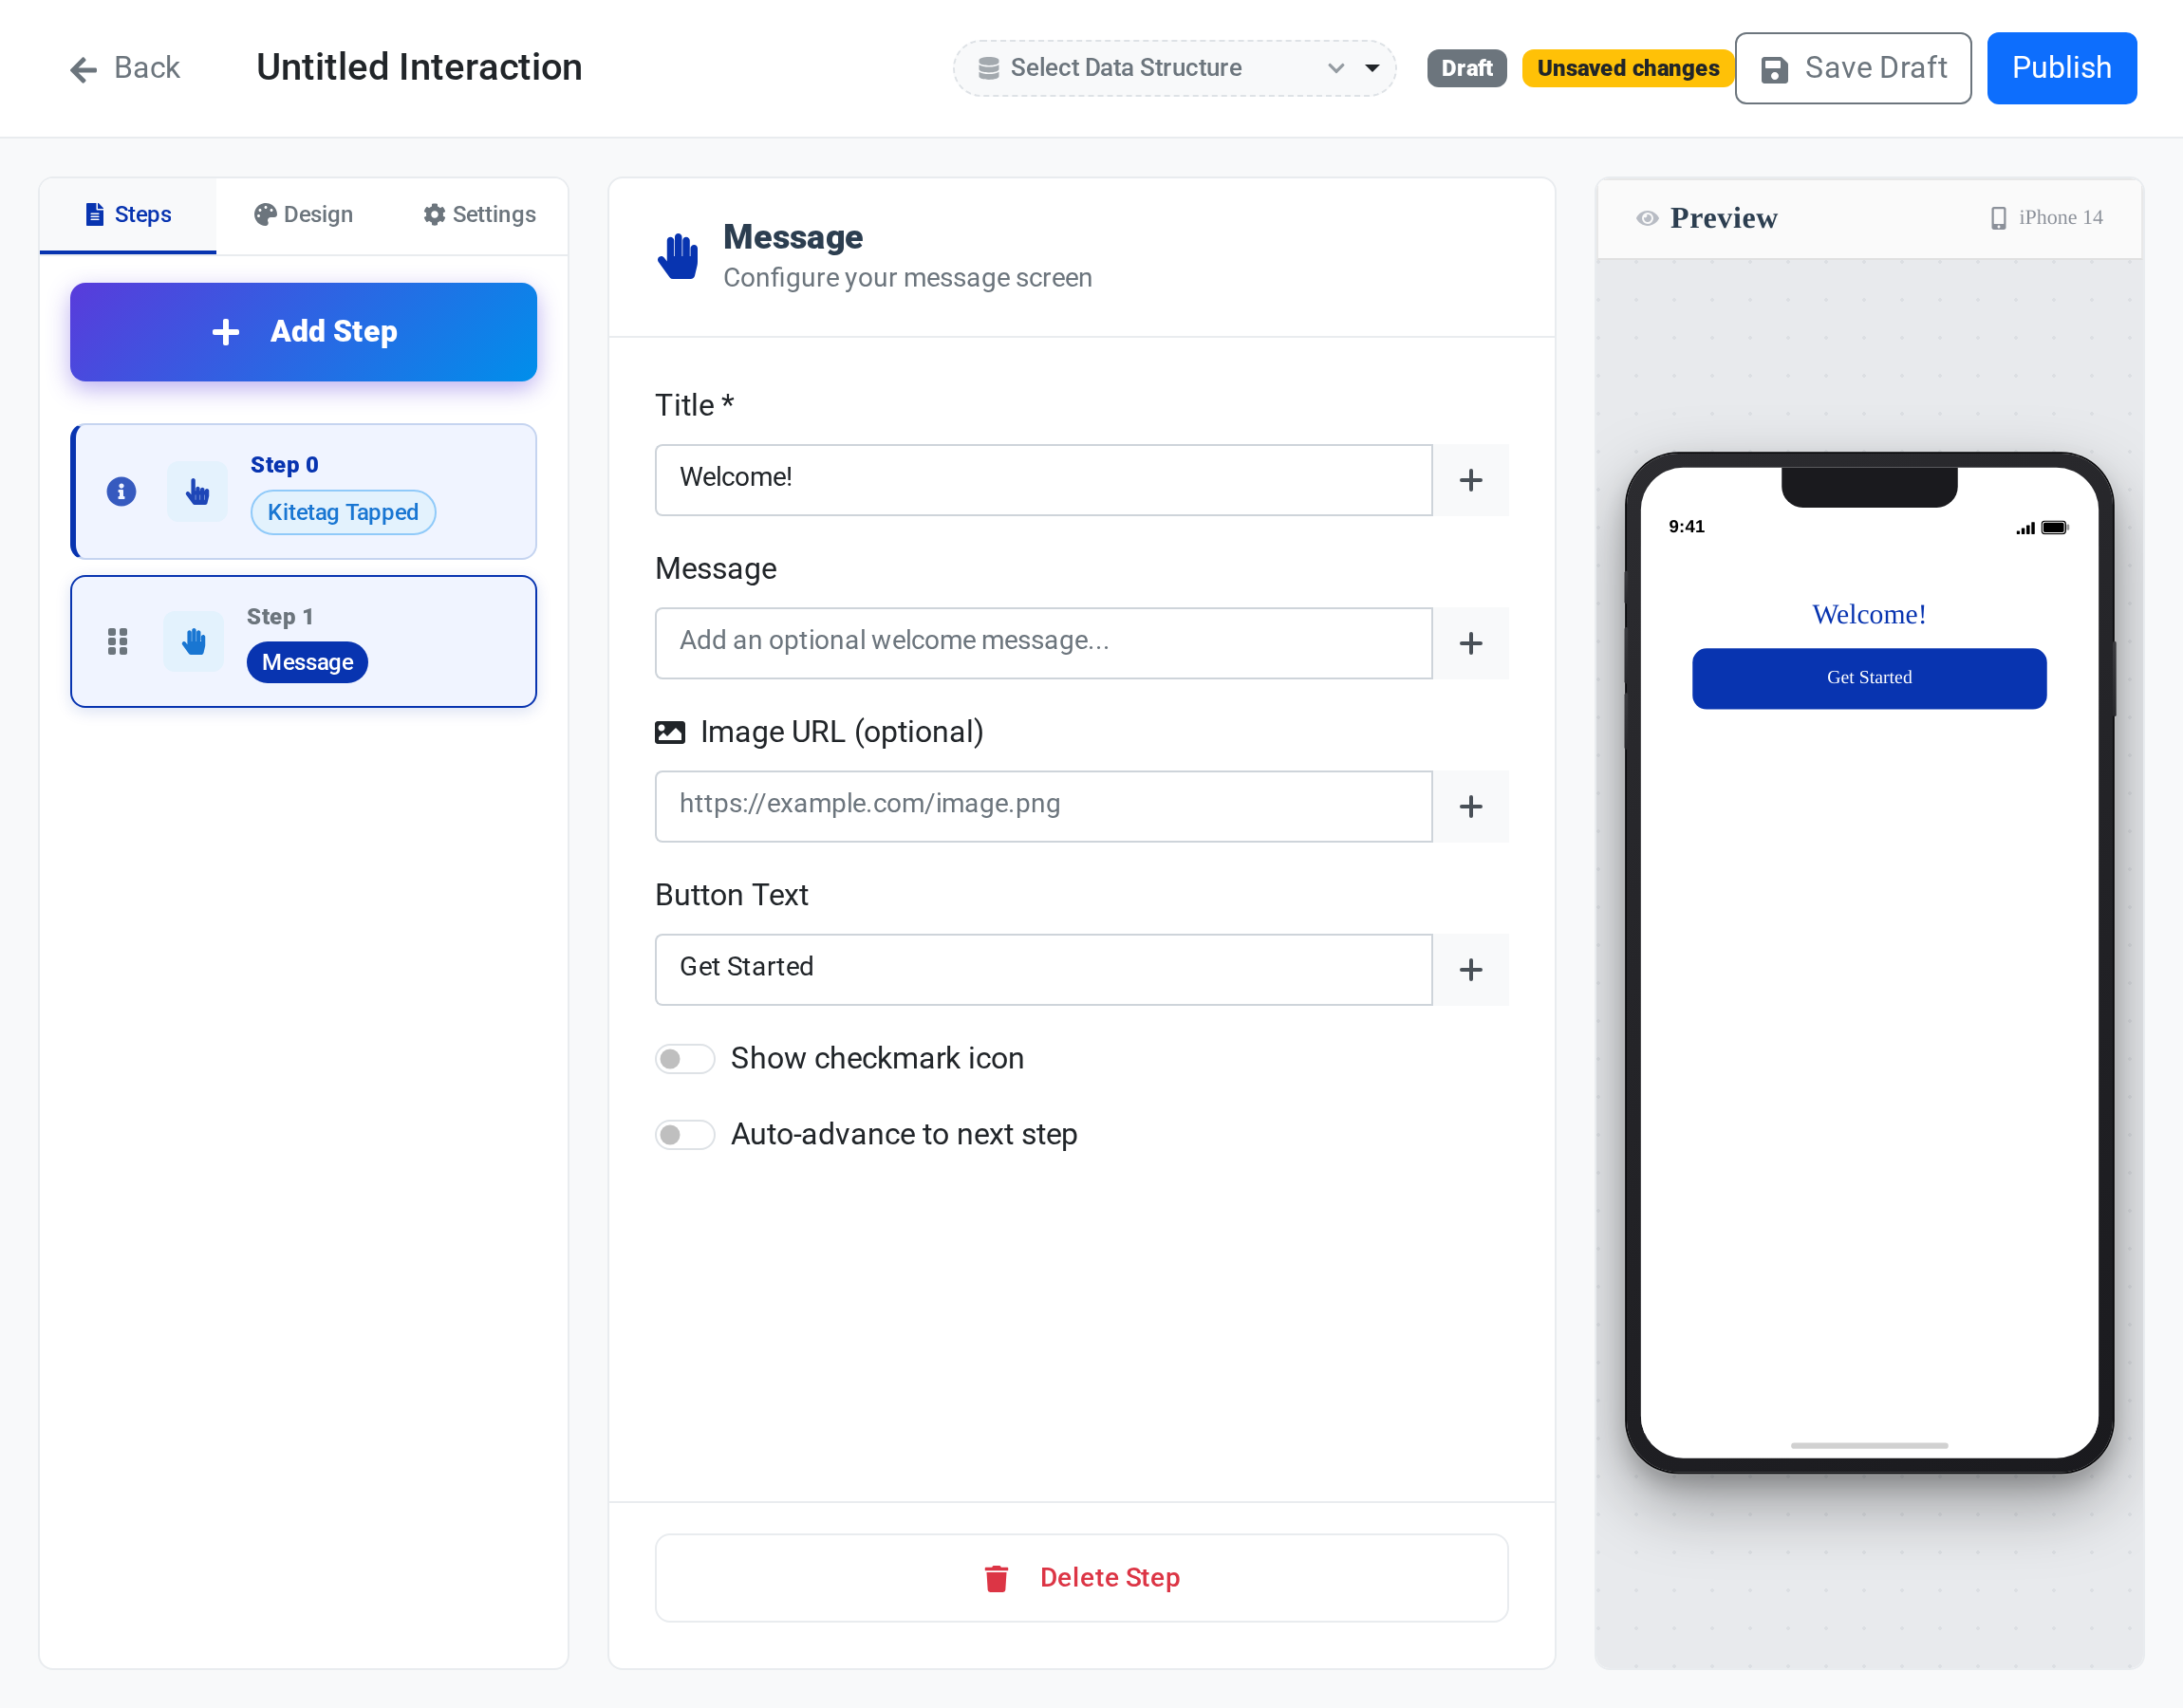 The Interaction Builder: step list (left), the selected step’s configuration (center), and a live iPhone preview (right).
The three tabs: Steps, Design, Settings
The builder has three tabs across the top of the configuration panel:
| Tab | What you configure |
|---|---|
| Steps | The sequence of steps — add, remove, reorder, configure each step’s content |
| Design | Colors, fonts, and a logo applied to every display step in this interaction |
| Settings | Interaction name and the Kitetag Data Structure (KDS) the flow reads from |
A live iPhone 14 preview on the right side of the builder updates as you edit, so you can see what the Tapper will see before publishing.
Step 0: Kitetag Tapped
Every interaction begins with a fixed Step 0: Kitetag Tapped. It is always shown at the top of the step list as a visual anchor — you cannot drag, rename, or delete it. Step 0 represents the moment the Tapper taps their phone on the Kitetag; your configurable steps are numbered 1, 2, 3… after it.
Step 0 is not a step you build — it’s the event that starts the flow.
Step types
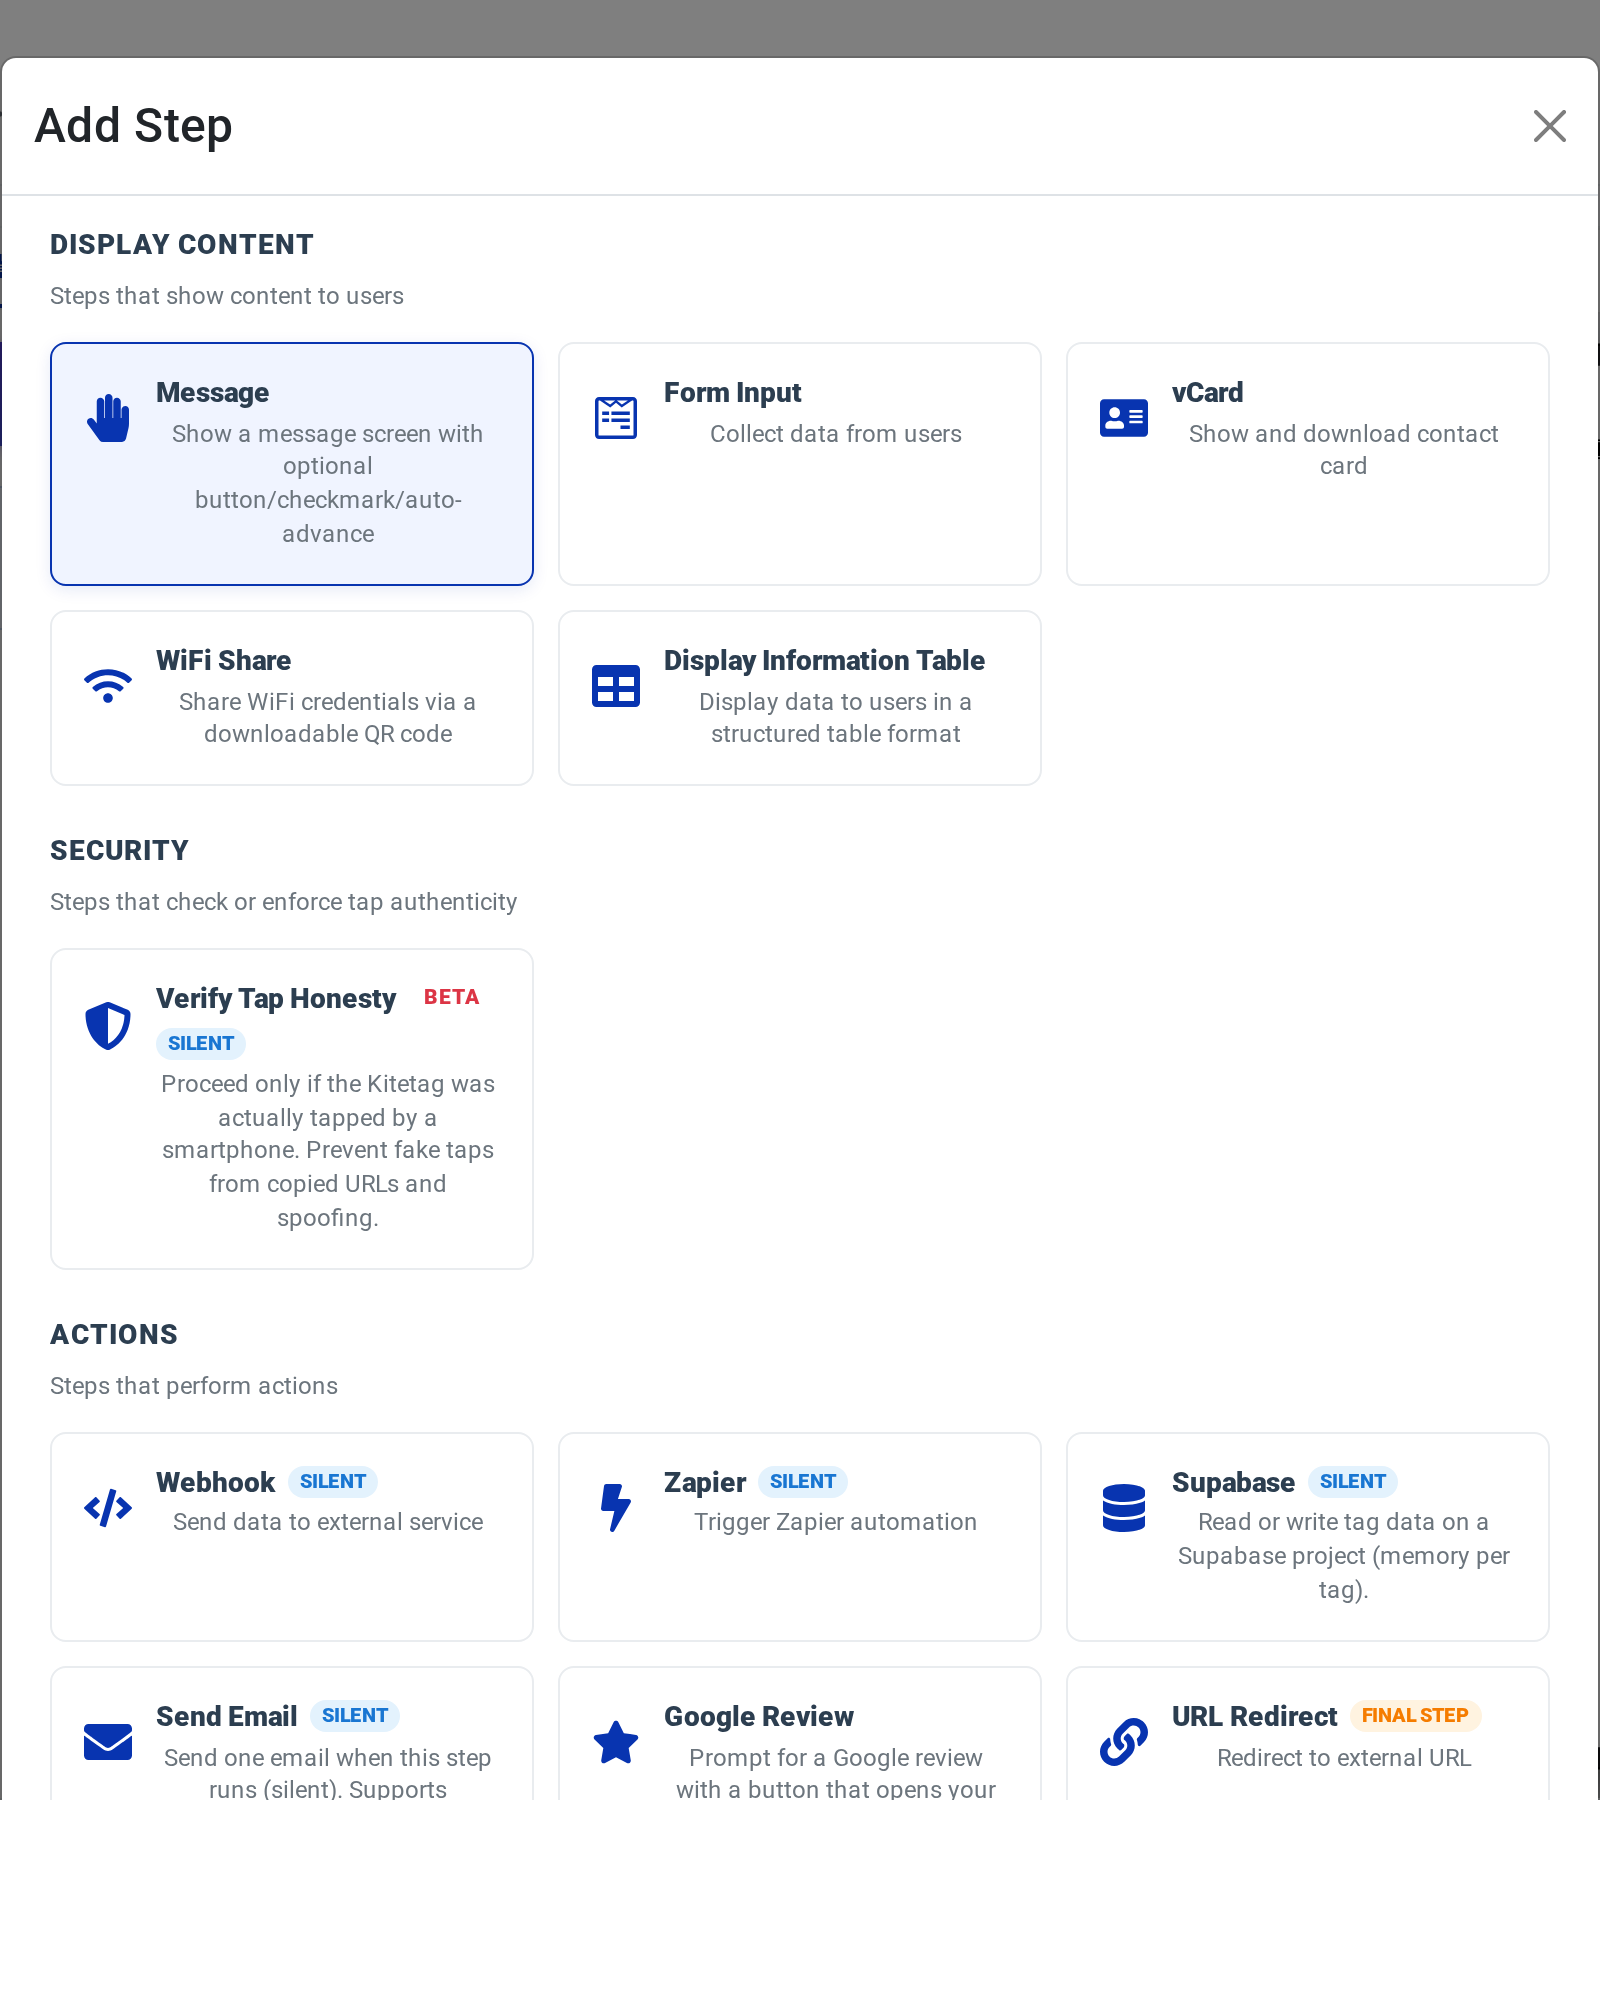
The Add step button opens a catalog of step types, grouped into three categories: Display Content, Security, and Actions. An interaction can have up to 20 steps.
Display Content (the Tapper sees and interacts with)
| Step type | Purpose |
|---|---|
| Message | A welcome or confirmation screen with a title, message body, and optional Continue button |
| Form Input | Collect one or more fields (Text, Email, Phone, Dropdown, Radio, Checkbox) from the Tapper |
| vCard | Render a contact card on screen with a Save & Continue button that downloads a .vcf file to the Tapper’s phone |
| WiFi Share | Share WiFi credentials via a scannable/downloadable QR code |
| Display Information Table | Show a table of label/value rows, optionally with a continue button (great for part numbers, calibration data, specs) |
Security
| Step type | Purpose |
|---|---|
| Verify Tap Honesty (Beta) | A silent step that lets the flow continue only if the Kitetag was genuinely tapped by a smartphone — blocking fake taps from copied URLs and spoofing. Marked Beta in the catalog. |
Actions (run behind the scenes or end the flow)
| Step type | Purpose | Behavior |
|---|---|---|
| Webhook | POST tap data and collected form responses to your endpoint | Silent — runs in the background and auto-advances |
| Zapier | Trigger a Zapier automation | Silent — same auto-advance behavior |
| Supabase | Read or write tag data on a Supabase project (a small amount of memory per tag) | Silent |
| Logic + Data (Beta) | Transform variables (math and text) and branch the flow to a different step based on a condition | Silent |
| Send Email | Send one email when this step runs. Supports KDS templates in the subject and body | Silent |
| Venmo Pay | Show a payment screen that collects a Venmo/PayPal payment, tip, or donation (USD) | Shows UI; advances after a successful payment |
| Google Review | Show a screen that prompts the Tapper for a Google review, with a button that opens your review link | Terminal — ends the flow |
| App Install | Send the Tapper to your mobile app in the App Store or Google Play, based on their phone | Terminal — redirects to the matching store |
| URL Redirect | Send the Tapper to a URL | Terminal — ends the flow by navigating away |
Silent vs. terminal steps at a glance
- Silent steps (Webhook, Zapier, Supabase, Logic + Data, Send Email, Verify Tap Honesty) don’t show any UI. They execute, then the flow continues to the next step.
- Venmo Pay shows a payment screen but is not terminal — after a successful payment it can advance to the next step (or be the last step).
- Terminal steps (URL Redirect, Google Review, App Install) end the flow. Only one terminal step is allowed per interaction — once you add one, the catalog disables the others and the builder keeps it pinned to the end of the step list, placing any new step before it. You don’t need to manually reorder.
- A Message step with its button text cleared and auto-advance off also acts as a terminal “thank you” screen — the flow simply stops there.
Configuring each step type
Message step
Used at the start (“Welcome!”) or end (“Thanks for tapping!”) of a flow.
Fields:
- Title — The large heading shown to the Tapper.
- Message — The body text. Supports KDS template placeholders like
{{ callsign }}. - Button Text — Label on the Continue button. Leave empty to hide the button on a terminal “Thank You” screen.
- Show checkmark icon — Displays a circled checkmark above the title (good for confirmation screens).
- Auto-advance to next step — Optional countdown timer that moves the Tapper forward automatically.
Form Input step
Collect information from the Tapper at tap time.
Add fields one at a time. Each field has:
- Label — Shown above the input.
- Type — One of: Text Input, Email, Phone, Dropdown, Radio Buttons, Checkbox.
- Placeholder — Hint text inside the empty input.
- Required — Blocks submission if left blank.
- Options — For Dropdown, Radio, or Checkbox types, the selectable values.
Form Input also has a Submit Button Text field — the label on the button that submits the form and advances to the next step.
vCard step
Displays a contact card and lets the Tapper save it to their phone’s address book.
Fields:
- Title and Description — Shown above the contact details.
- Contact fields — Full Name, Email, Phone, Organization, Title, URL, Note, and more. Each can be a literal value or a KDS template (
{{ first_name }},{{ email }}). - Allow download to phone — When enabled, the primary button reads Save & Continue and triggers a
.vcfdownload before advancing. When disabled, the button reads Continue and just moves forward. - Show contact preview — Displays the contact fields to the Tapper before they save.
Email and phone links in the preview are tappable — mailto: and tel: — so the Tapper can email or call without saving the contact first.
WiFi Share step
Shares WiFi credentials for a venue’s guest network. Full guide with screenshot: WiFi Share.
Fields:
- Network Name (SSID) — Exactly as broadcast by your router.
- Security —
WPA/WPA2/WPA3,WEP, orNone (open network). - Password — Hidden behind a show/hide toggle in the builder.
- Hidden network — Check this if the SSID does not broadcast.
- Venue / Brand Name (optional) — Displayed above the QR code so the Tapper knows whose WiFi they are connecting to.
- Instructions — Short text telling the Tapper what to do next.
- Download Button Text — Label on the button that downloads the QR code image.
The tap screen shows the venue name, a QR code image, the instruction text, and a download button. Most modern phones (iOS 11+, Android 10+) recognize the QR code and offer to join the network.
Display Information Table step
Full guide: Display Information Table.
Shows a two-column table of information to the Tapper — ideal for part numbers, calibration data, event details, or any structured read-only content.
Fields:
- Table Title (optional) — Heading above the table. Supports KDS templates.
- Description (optional) — Subtitle text.
- Table Rows — Add one row at a time. Each row has a Name (left column label) and a Display Value (right column value). Both support KDS templates and can include literal text. Drag the grip handle to reorder rows.
- Submit Button Text (optional) — If empty, no button appears and the flow ends at this step. If set, a button with that label advances to the next step.
Use Display Information Table when you want the Tapper to read structured data tied to the specific tag they just tapped.
Webhook step
Sends tap data (and any form responses from earlier steps) to your HTTP endpoint.
Fields:
- URL — The destination
https://URL. - HTTP method — Usually
POST. - Custom headers — Optional
Key: Valueheaders (e.g. authentication tokens).
The step is silent: the Tapper never sees a “sending request” page. If the webhook fails, the flow logs the error and continues to the next step. See the webhook reference for the JSON payload shape.
Zapier step
Same pattern as Webhook but uses a Zapier webhook URL. See the Zapier integration guide for zap setup.
URL Redirect step
Sends the Tapper to an external URL. This is a terminal step — the flow ends here by navigating the browser away.
Fields:
- URL — The destination. Supports KDS templates, so you can redirect to a per-tag URL. Must be an
http://orhttps://address.
Send Email step
Sends one email each time the step runs. It is silent — the Tapper sees no email-related screen; the flow continues to the next step. Full guide: Send Email.
Fields:
- Recipient(s), Subject, and Body — All support KDS templates and values collected by an earlier Form Input step (for example, email the address a Tapper just entered).
Email delivery uses your connected Gmail account. Connect Gmail first from the Apps page; see the Apps overview.
Google Review step
Shows a screen that asks the Tapper to leave a Google review, with a button that opens your Google review link. Full guide: Google Review.
Fields:
- Review URL — Your business’s Google review link (from your Google Business Profile).
- Title and Message — The prompt text shown above the button.
- Button Text — Label on the button that opens the review link.
App Install step
Sends the Tapper to your mobile app, picking the store automatically from the phone they tapped with: iPhone → Apple App Store, Android → Google Play. It is a terminal step. Full guide: App Install.
Fields:
- Google Play (Android) and App Store (iOS) sections — each has a search bar. Type your app’s name, then click the correct result. The app’s icon, name, and publisher are shown so you can confirm the right app before publishing.
You can configure one or both stores. iPhone and Android Tappers are redirected to the matching listing automatically; visitors on an unidentified device (such as a desktop) see both store buttons instead. Routing is powered by Dynamic Tap Data.
Supabase step
Reads or writes a small amount of per-tag data on your own Supabase project — useful for giving a tag “memory” (a visit counter, last-seen value, or a stored choice). It is silent. Full guide with screenshot: Supabase Data.
Fields:
- Supabase connection and the table / column to read or write. Connections are managed on the Apps page.
The Design tab
The Design tab controls the look of every display step in the interaction. Changes apply to every Message, Form, vCard, WiFi Share, and Display Information Table step — not just the one you’re editing.
Configurable settings:
- Color scheme — Pick from presets or set Primary Color, Background Color, and text colors individually.
- Typography — Font Family (Inter, Arial, Georgia, and more), Font Weight (300–700), Font Size.
- Logo — Upload an image (PNG/JPG/SVG) shown above every display step.
The iPhone 14 preview updates live as you change these settings. Your choices are saved with the interaction — use different interactions for different brands or sub-brands.
Building your first step-based interaction
- Click Create Interaction from the Interactions page, or open kitetags.dev/interaction-builder/new.
- In the Settings tab, give the interaction a name and pick the Kitetag Data Structure (KDS) it should read from.
- Back in the Steps tab, click Add step and choose a step type. Step 1 is added below Step 0.
- Fill in the step’s configuration in the right panel. Watch the iPhone preview.
- Add more steps as needed. Drag the grip handle on the left of any step to reorder — except Step 0 (fixed) and URL Redirect (pinned to the end).
- Switch to the Design tab to pick colors, fonts, and upload a logo.
- Click Save Draft to save without publishing, or Publish to make it live.
- Assign the interaction to a Kitetag Group. All tags in that group will use the new flow on their next tap.
What the Tapper sees
When someone taps a tag whose group is assigned a step-based interaction, their browser loads a mobile-first tap page:
- Progress dots at the top show the number of visible steps (silent steps like Webhook and Zapier are excluded from the count).
- Each display step uses the colors, fonts, and logo from the Design tab.
- Silent steps run in the background with a brief loading indicator, then auto-advance.
- The flow ends at a terminal step (URL Redirect → navigates away) or at the last non-terminal step (stays on that screen).
Example flows
Café guest-WiFi flow:
- Message — “Welcome to Blue Bean Café”
- WiFi Share — SSID, WPA2 password, venue name
- Message — “Thanks for visiting” (terminal, no button)
Event check-in flow:
- Message — “Welcome to the conference”
- Form Input — Name + Email (required)
- Webhook — Log the check-in to your CRM (silent)
- Display Information Table — Room number, session schedule
- URL Redirect — Open the event agenda PDF
Asset-tracking flow:
- Display Information Table — Serial number, last maintenance date, manual link (all pulled from KDS)
- Form Input — “Log an inspection note” (optional)
- Webhook — Send the note to an internal tracker (silent, terminal)
Next steps
- Review the single-action Apps as a simpler alternative for one-thing-on-tap scenarios.
- Learn how Kitetag Data Structures (KDS) define the fields that appear as
{{ placeholders }}. - Personalize flows by device and location with Dynamic Tap Data (DTD) —
{{ DTD.* }}placeholders available in every step. - Configure a webhook endpoint to receive form and tap data.
- Understand how flows are assigned in Kitetag Groups.
Last updated 10 Jun 2026, 20:39 -0700 .